

Friday, July 29, 2011
Still thinking about strawberries...
I was working on some original artwork and did this little guy last night. I like it, but have yet to figure out what I'm going to do with it. Any ideas?

Thursday, July 28, 2011
Art Nouveau Vs. Art Deco: styles demystified
I've had an interesting influx of clients with the art deco/art nouveau interest in their invitations. One was inspired by her event site, which architecturally is Art Nouveau and the other has an engagement ring with a beautiful art deco design to it. Here's the thing, sometimes I think I'm pretty clear on the differences, but so often the 2 styles are confused in my head (and in my client's heads). Are they in yours? Like, is a fascinator an art deco accessory or an art nouveau? I'm actually still not sure on that one. I think it's more art nouveau.
I did a little teensy bit of research so that I had these two periods of fine art and architecture straight in my mind. Here's the low-down:
Art Nouveau came first:
According to Wikipedia, it was a "reaction to academic art of the 19th century, it was inspired by natural forms and structures, not only in flowers and plans, also in curve lines. The architects tried to be in harmony with the natural enviroment. It is also considered a philosophy of design of furniture. They must be designed according to the whole building and making part of ordinary life." This period was from the 1890s to the 1900s.
I think: organic lines and shapes, fairies, flowers and dragonflies, designs that are often contained in a structured shape (for instance, a tree is organic but fills or creates a rectangular shape) and roman toga-draped figures like Bacchus (that part is completely my interpretation and you should know that I received poor grades in Art History)
Here are some examples of various modern-day interpretations and original art:
This invitation is designed by Dear Emma Stationery, available on etsy.
![]()
![]()
![]()
![]()
![]()
![]()
To add to the confusion, when I looked up Art Nouveau architecture in Cincinnati, I got the whole Art Deco/Nouveau blur...no wonder it's confusing to us! I did see this crazy place, which I watched morph into whatever it is now as I was a young gal in an apartment near this house. I had a good laugh to see it in the "Art Nouveau" architecture sample. Really, what is that????
![]()
Anyhoo...
Art Deco came next:
Again, I turn to Wiki and it tells us that Art Deco "began in Paris in the 1920s and flourished internationally throughout the 1930s, into the World War II era. Art Deco's linear symmetry was a distinct departure from the flowing asymmetrical organic curves of its predecessor style Art Nouveau; it embraced influences from many different styles of the early 20th century, including Neoclassical, Constructivism, Cubism, Modernism and Futurism[5] and drew inspiration from ancient Egyptian and Aztec forms."
The top of the Chrysler Building in NYC is an example of this style. When I put Art Deco in a nutshell, it is all about straight but dynamic lines, black and gold, geometric shapes, bas relief scultptures, movie star glam and designs that look like it's got it's chest puffed out and heading for the moon, you know what I mean? Onward and upward to the future and beyond kind of thinking.
Here are some examples: (actually, I think this dress on the left is nouveau and deco on the right)
![]()
![]()
![]()
In Cincinnati, we are fortunate to have some amazing examples of Art Deco architecture. The Cincinnati Omni Netherland Hotel (I think I got that right, they keep adding more names to themselves), The Union Terminal and the 20th Century Theater in Oakley.
![]()
![]()
![]()
Do we have it down now? And when we google one, we can distinguish from the other when google tries to confuse us, right? Right? Right. Have a great day!
I did a little teensy bit of research so that I had these two periods of fine art and architecture straight in my mind. Here's the low-down:
Art Nouveau came first:
According to Wikipedia, it was a "reaction to academic art of the 19th century, it was inspired by natural forms and structures, not only in flowers and plans, also in curve lines. The architects tried to be in harmony with the natural enviroment. It is also considered a philosophy of design of furniture. They must be designed according to the whole building and making part of ordinary life." This period was from the 1890s to the 1900s.
I think: organic lines and shapes, fairies, flowers and dragonflies, designs that are often contained in a structured shape (for instance, a tree is organic but fills or creates a rectangular shape) and roman toga-draped figures like Bacchus (that part is completely my interpretation and you should know that I received poor grades in Art History)
Here are some examples of various modern-day interpretations and original art:
This invitation is designed by Dear Emma Stationery, available on etsy.
To add to the confusion, when I looked up Art Nouveau architecture in Cincinnati, I got the whole Art Deco/Nouveau blur...no wonder it's confusing to us! I did see this crazy place, which I watched morph into whatever it is now as I was a young gal in an apartment near this house. I had a good laugh to see it in the "Art Nouveau" architecture sample. Really, what is that????
Anyhoo...
Art Deco came next:
Again, I turn to Wiki and it tells us that Art Deco "began in Paris in the 1920s and flourished internationally throughout the 1930s, into the World War II era. Art Deco's linear symmetry was a distinct departure from the flowing asymmetrical organic curves of its predecessor style Art Nouveau; it embraced influences from many different styles of the early 20th century, including Neoclassical, Constructivism, Cubism, Modernism and Futurism[5] and drew inspiration from ancient Egyptian and Aztec forms."
The top of the Chrysler Building in NYC is an example of this style. When I put Art Deco in a nutshell, it is all about straight but dynamic lines, black and gold, geometric shapes, bas relief scultptures, movie star glam and designs that look like it's got it's chest puffed out and heading for the moon, you know what I mean? Onward and upward to the future and beyond kind of thinking.
Here are some examples: (actually, I think this dress on the left is nouveau and deco on the right)
In Cincinnati, we are fortunate to have some amazing examples of Art Deco architecture. The Cincinnati Omni Netherland Hotel (I think I got that right, they keep adding more names to themselves), The Union Terminal and the 20th Century Theater in Oakley.
Do we have it down now? And when we google one, we can distinguish from the other when google tries to confuse us, right? Right? Right. Have a great day!
Friday, July 22, 2011
DIY Weekend Projects: A rug, a bench and a cross-stitched wall
Now that swim team is officially over, I feel the need to dive into some projects that have been swimming around in my creative pool. We decided last night to switch the kids around in their rooms. I had the girls in the bigger one and the boy in his own room, but little O kept crawling into N's bed for security and since they have a few years until puberty I figured this would make sense for a while. O's room still has remnants of the nursery, plus some scribbles and tape and lipstick and holes that need to be fixed so it's about time to fix it up anyway. Luckily, the wide world of the internet has lots of simple ideas for me.
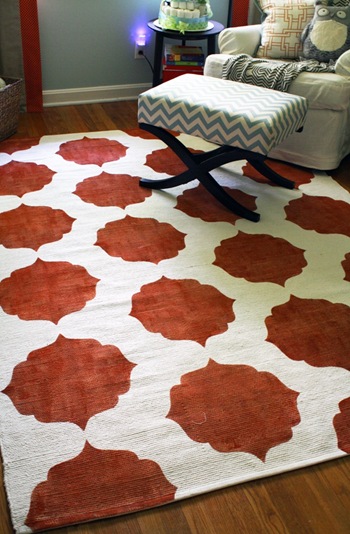
I like this DIY painted rug from Ikea created by Cristi from Charm Home. Depending on the design you choose, it could be fairly simple to do. I had to read the entire post before I realized that the rug started out white and the pattern is painted in a terracotta color--don't know how I missed that the first time. Here's my issue though, those rugs are difficult to vacuum. I'm always sucking up the corners and then entering into a wrestling match to remove the rug before the belt breaks. *sigh* Cleaning doesn't come naturally for me.
 Or this bench from a shelf is pretty sweet (tutorial on OhDeeDoh). I think I can handle a staple gun project (no sewing for this girl--that's my mom's job). We've got some shelves that came out of the kitchen when we rehabbed it.
 I don't have the confidence to do this fabulous idea but I can dream...
![]()
Hope you all have a creative weekend! I'm going to try to stop sweating but I think at this point it's futile....
I like this DIY painted rug from Ikea created by Cristi from Charm Home. Depending on the design you choose, it could be fairly simple to do. I had to read the entire post before I realized that the rug started out white and the pattern is painted in a terracotta color--don't know how I missed that the first time. Here's my issue though, those rugs are difficult to vacuum. I'm always sucking up the corners and then entering into a wrestling match to remove the rug before the belt breaks. *sigh* Cleaning doesn't come naturally for me.

Hope you all have a creative weekend! I'm going to try to stop sweating but I think at this point it's futile....
Wednesday, July 20, 2011
Sentimental and personal anniversary gift ideas
Not to brag or anything, but I've got the best husband ever. He does the laundry, shares dinner duty, fixes small plumbing crises, mows the lawn with 3 kids attached to his body, takes me to see Glen Hansard sing, loves me and my quirks. Hard to find another guy like that and I hope I never have to.
Our 13th anniversary is coming up in August and I've had my eye out for a little sentimental gift I can make or buy for him. I like this one because it is so simple and when you've been married a while, sometimes less is more. Anyway, I might change the wording a little bit, but I like the idea of a short love phrase and the date when it became official. This might be a nice accent pillow for our bedroom (since nobody else really needs to see the gushy stuff, right?). Sweet.
![]()
Then, since I was a little printer monkey this morning (I was hand-feeding some envelopes, which means I have about 15 seconds to wait until another envelope goes in. It's perfect for surfing my favorite blogs sans guilt!) I found some other really personal and sentimental gift ideas if you're in the market for that kind of thing.
 Here are the crafty and clever folks who designed these great gifts:
1. Wood grain print (how cute are the kids names on the leaves??) by Cozy Blue
2. State silhouette with heart by Define Design 11
3. Silver charm (cute for a keychain too!) by Say Anything Jewelry
4. Custom city posters by Alexander & Company
5. Family Love Tree print from Colorbee Love
6. Engraved stone (paper weight, in a plant, on the patio?) by SJ Engraving
7. Home Is Wherever I'm With You print by Apple Blossom Print
8. Custom Vows print by Circle Prints
9. Couple silhouette print by Your Very Own Artist
Our 13th anniversary is coming up in August and I've had my eye out for a little sentimental gift I can make or buy for him. I like this one because it is so simple and when you've been married a while, sometimes less is more. Anyway, I might change the wording a little bit, but I like the idea of a short love phrase and the date when it became official. This might be a nice accent pillow for our bedroom (since nobody else really needs to see the gushy stuff, right?). Sweet.
Then, since I was a little printer monkey this morning (I was hand-feeding some envelopes, which means I have about 15 seconds to wait until another envelope goes in. It's perfect for surfing my favorite blogs sans guilt!) I found some other really personal and sentimental gift ideas if you're in the market for that kind of thing.

1. Wood grain print (how cute are the kids names on the leaves??) by Cozy Blue
2. State silhouette with heart by Define Design 11
3. Silver charm (cute for a keychain too!) by Say Anything Jewelry
4. Custom city posters by Alexander & Company
5. Family Love Tree print from Colorbee Love
6. Engraved stone (paper weight, in a plant, on the patio?) by SJ Engraving
7. Home Is Wherever I'm With You print by Apple Blossom Print
8. Custom Vows print by Circle Prints
9. Couple silhouette print by Your Very Own Artist
Tuesday, July 19, 2011
Thinking about strawberries
I dont' know why, strawberries have been out of season for months in my part of the world. I just was thinking that a strawberry themed bridal (or baby) shower might be kind of fun, especially if the bride is a lover of food, baking, gardening, vintage things or is having an outdoor spring wedding. While that stews in my creative juices, I'll share some of the inspiring images I've found.
![]()
![]()
![]()
![]()


Source: lasweetsettings.blogspot.com via Margot on Pinterest
Friday, July 15, 2011
A new look at host card displays
Okay, so you've got to tell your guests where they will be sitting at your wedding. This is commonly done with host cards or escort cards. The guests name is written on the front of a card (or tiny envelope) and a table assignment is listed on the inside. This is the tried and true method for sure. But sometimes you want to be a little more creative, don't you?
Pinning up colorful tags on a board is another idea to display the escort cards. And get your guests to their assigned tables with a little flair. I like it because it is still logical (meaning, guests can look up their names alphabetically etc.) but it allows for some pops of color and pattern. Try covering a standard cork board with linen fabric and setting it up on an easel stand at the entrance of your reception venue. Use a punch to cut shapes from fabric (like this shot from Martha Stewart) or scrapbooking papers (like the one from Leslie Shrewring). The trick is to keep the format exactly the same and just switch out the patterns on the die-cut. Kinda makes me want to make some gift tags...(distractions, distractions).
![]()
![]()
Pinning up colorful tags on a board is another idea to display the escort cards. And get your guests to their assigned tables with a little flair. I like it because it is still logical (meaning, guests can look up their names alphabetically etc.) but it allows for some pops of color and pattern. Try covering a standard cork board with linen fabric and setting it up on an easel stand at the entrance of your reception venue. Use a punch to cut shapes from fabric (like this shot from Martha Stewart) or scrapbooking papers (like the one from Leslie Shrewring). The trick is to keep the format exactly the same and just switch out the patterns on the die-cut. Kinda makes me want to make some gift tags...(distractions, distractions).
Thursday, July 14, 2011
Mehndi Art with Henna: the original temporary tatoo
Last week I spend a lovely vacation in Door County, Wisconsin on Kangaroo Lake for an extended family vacation. I'm pleased to say that not only did we not revert back to 12 year old fits or mental breakdowns (I'm referring to myself here, you know how family sometimes brings out the worst in you...) this was the first place I've been to that I'd actually return again. Usually I'm done and bored with a spot in a week (sometimes sooner) but Door County has beautiful 80 degree temperatures, a lake, lots of interesting shops, restaurants, cafes and frozen custard stores. Really great.
Since we were lucky to be there for the Forth of July, we attended the parade and craft fair afterwards. One of the booths had henna artists and I couldn't resist a little body decoration. I don't have tatoos (and really don't want one) but the idea of being decorated with a little summer flair sounded like a good time to me. As I watched the artist, I knew an obsession was starting. Swirly, floral, decorative, dots, paisleys...how could I have not known about this before??? I was so into it, I was sure this was my occupation in one of my past lives. Here's what mine looked like when the henna was just applied.

Of course, upon returning to Cincinnati, I immediately went out to Michael's Craft stores and bought one of their kits to give it a try myself. I practiced on my kids and myself. I wasn't happy with the henna mixture so now I've going to try this recipe so I can do it again. I chose Holly's recipe because I like the logo on her website--I just trust someone who has good graphic taste. I'm thinking about having a girls night Mehndi henna tent party...doesn't that sound like so much fun?? Some hummus, olives, exotic drinks...it's like the Red Tent kinda!
I love that the art of Mehndi is over 5000 years old! It originated in Egypt, staining the fingers and toes of pharohs. It is widely used in African and Indian culture, decorating the women and brides with intricate gloves of henna and using symbols within the designs to wish good health and fertility upon the brides. I just love that kind of ritual and good energy. Girls rock! Here are some really stunning examples:
![]()
![]()
![]()
![]()
Since we were lucky to be there for the Forth of July, we attended the parade and craft fair afterwards. One of the booths had henna artists and I couldn't resist a little body decoration. I don't have tatoos (and really don't want one) but the idea of being decorated with a little summer flair sounded like a good time to me. As I watched the artist, I knew an obsession was starting. Swirly, floral, decorative, dots, paisleys...how could I have not known about this before??? I was so into it, I was sure this was my occupation in one of my past lives. Here's what mine looked like when the henna was just applied.

Of course, upon returning to Cincinnati, I immediately went out to Michael's Craft stores and bought one of their kits to give it a try myself. I practiced on my kids and myself. I wasn't happy with the henna mixture so now I've going to try this recipe so I can do it again. I chose Holly's recipe because I like the logo on her website--I just trust someone who has good graphic taste. I'm thinking about having a girls night Mehndi henna tent party...doesn't that sound like so much fun?? Some hummus, olives, exotic drinks...it's like the Red Tent kinda!
I love that the art of Mehndi is over 5000 years old! It originated in Egypt, staining the fingers and toes of pharohs. It is widely used in African and Indian culture, decorating the women and brides with intricate gloves of henna and using symbols within the designs to wish good health and fertility upon the brides. I just love that kind of ritual and good energy. Girls rock! Here are some really stunning examples:
Tuesday, July 12, 2011
My 40th Birthday Party: The Untold Story
Did I lure you in with my scandalous title?? This post is going to be exciting, but maybe not Fox-worthy. I wanted to share all the vendors and details that made my party a success so you can start planning your next birthday party. (Did you get my lecture on why you should throw yourself a birthday party? It's quick: You should.)
Let's begin at the very beginning...the inspiration photo that I took last winter:

INVITATIONS
Designed by Margot Madison, world-famous invitation designer ;o) Letterpress with hot pink ink and inkless impression on Crane's Pearl 600 gsm cardstock. The liners were designed and printed in full color and cut to fit the envelopes. Envelopes were from Paper Source, A7 fuchsia. Fonts were Century Gothic and Aphrodite Slim Pro. You can read a little more about them here.

TABLE DECORATIONS
I used white stock tablecloths from the vendor. I purchased white paper doilies in 4", 8" and 12" sizes and placed them in a random (which means very purposely placed to look random) pattern along the length of the table. I used double stick tape for some of the doilies so they wouldn't be blown away when the AC kicked on. I spent several months collecting miscellaneous milk glass vases and containers from my local Goodwill. Not one was more than $2. If you don't have that kind of time, you can check around etsy vendors like this one and amass a collection pretty quickly. I focused on patterned designs and skipped the fruit and floral designs since my inspiration was more about graphic repeated patterns. The flowers were designed by my friend Joni from Sprouts Floral Designs who filled them with red, pink and orange roses and carnations. In an ideal world, they would have been ranunculous or peonies but those are just not available at the end of June in Cincinnati, Ohio. I thought the roses and carnations were an excellent substitute. Joni and I arranged groupings of vases based on differing shapes, heights and patterns. I loved how they looked, and also thought that even though they were so full of color, they still struggled to stand up to the bigness of the room. Had I a chance to do it again, I'd include at least twice as many per table.
The candles were Fenomen white pillars from IKEA that I covered in my Chiyogami decorative paper (found here) and adhered with my handy-dandy tape gun. The Glimma glass votives and votive candles were also from IKEA. I used some white puff paint to add a dot along the edge of the votives. I thought they needed a little somethin-somethin, you know? Of course I don't have a photo of the votives. I think I'll show that little project later on in a DIY Friday post.

 WELCOME PACKETS
These were my favorite to create and felt most like a gift from the essence of Margot-ness. I wanted to find some way to make my guests feel truly special and honored. I also wanted all my friends and family to mingle, which as a sometimes introvert I can understand the need for a little push in the social direction. The packets were custom envelopes created from left-over envelope liner stock. I created the die on my computer and gave it a disappointing try on the Silhouette SD. NOBODY told me that you can't put text stock on the adhesive boards without ruining both the paper and the board. That was very annoying but I persevered printed the template on the back of the paper (the white side). I then cut with my X-Acto knife and folded them into the little envelopes. I used Divine Twine in hot pink to tie them shut and wrote the guests names on pink, orange or red tags. Adorable! Inside I included custom name tags, using the round mandala design from my invitation printed onto pages of adhesive 2" circles from this on-line vendor. In addition to the guest's names, I included their relationship to me; Amy Benavente, Best Friend from College or Gail Bason, Margot's Mom etc. I think another great idea would be to include a fun fact about that person, but there were just too many guests to do that in my case. I included 2 Question Cards that had a set of 5 simple questions, encouraging guests to talk to someone they didn't know to get the answers. The cards were to be returned in a large glass container, where later in the evening I raffled off gifts that I'd brought with me. I must say, that I was most pleased with the results of this game. I saw friends and family from totally separate worlds talking to each other. It was really a joy for me to see that because awesome people should meet other awesome people! This approach took the awkwardness out of that first conversation, you know? I also had a hand-written note inside, thanking the guest for coming and for the other things they did for me throughout my 40 years of life. These notes were made from scrap envelope liner paper (I made good use out of that paper, didn't I??) folded on the short side and tucked into a business-card sized envelope that had the top chopped off with my rotary cutter scallop blade. Total cuteness.

 FEEDING THE MASSES
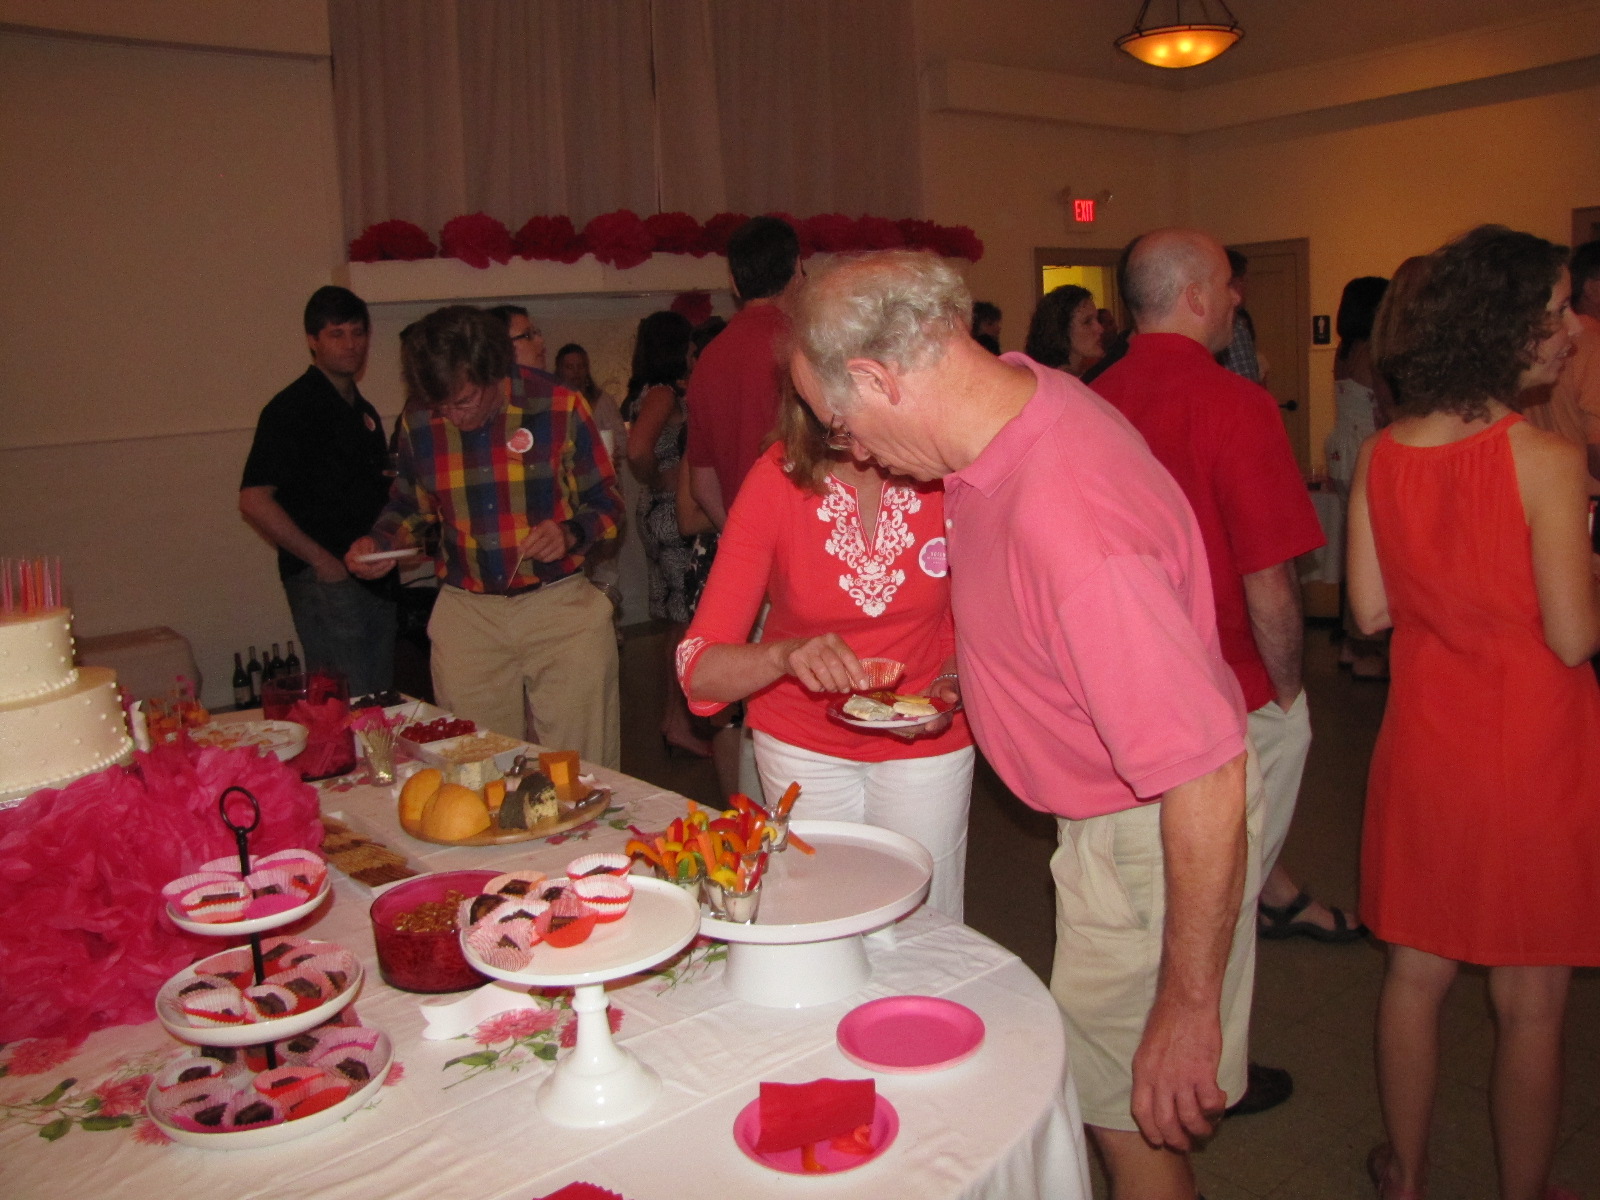
The party started at 8 p.m. so most people should have eaten some kind of dinner. I wanted to make sure everyone had enough wine and beer, so I focused on that. Then I added snacks so that the wine and beer were absorbed into the system before they had to leave. The birthday cake was baked by George Sias, who was recommended to me by Karen from the I-Do Boutique in O'Bryonville. He is totally off the grid (meaning, he doesn't even use email *gasp!*) so if you would like his contact info, you can email me and I'll send it to you. The cake was white with strawberry filling, and chocolate with chocolate filling. Totally delish! The cake decoration was one of my sticking points in the planning process. I met with one cake vendor and left feeling totally afraid that they were going to give me something that looked too much like a wedding cake. And I had wedding cake trauma that I won't bore you with right now, but suffice it to say: I did not want a repeat disappointment. I saw a wonderful post on how to make ruffle flowers from fondant and thought, "Why not? I'll give it a shot myself." Several days and red-stained hands later, I had some decent ones and packed them up for the final day. I asked George to keep the cake decor a simple white with dots around the edges, and I would add these brightly colored ruffle flowers myself. When the time came to add them to the perfectly white cake, I panicked. I didn't want to put them on and hate it! And then it would be too late to change. I opted for the "less is more" approach and filled the top with my orange, red and pink candles. I'm SO HAPPY I did that. It looked perfect to me.

The rest of the food was snacky: Fancied up hummus, kalamata olives, marinated mozzerella balls, pita triangles, Spicy pretzels, veggie shots (an inspiration after my husband found a random case of shot glasses while cleaning our garage) of red and yellow peppers, carrot sticks and sugar snap peas with ranch dressing at the bottom, Killer Brownie bites, cream puffs, fruit wands with washi tape flags and assorted cheeses with crackers. I also had Mad*Pops (made by Madisono's Gelato in Cincinnati), delicious fruity popsicles in bright pink tubs filled with ice.
The drinks included white and red wine, bottled water, raspberry lemonade (made by my amazing husband), and a delicious Amber Ale from the local Mt. Carmel Brewery. I had it in a keg because that seemed way more fun than bottles. I haven't tapped a kegger since college!
PARTY HARDWARE
Pink, red and orange dessert plates and napkins were from trusty Target. I used white 16 oz paper cups I found on sale at my local paper store and personalized them by printing stickers with the mandala pattern. The wine cups were standard clear plastic. I prefer glass in most cases but I was on a tighter budget than that would allow.
All the food was placed on white ceramic dishes or white milk glass pedestals. I kept to square shapes because I'm neurotic that way. The pink glass bowls were a set from IKEA and very useful for stacking. I made a simple riser for the cake by covering a square box with pink tissue. The food signs were printed on white cardstock, edges trimmed into a "V" and curved on the tails like a banner that can stand itself up. You do that by holding one end of the card to a table edge, pressing the other side with your palm and firmly dragging it down (similar to curling ribbon, only without the ribbon and the scissors). The tablecloth on the food table is a vintage floral I purchased from this etsy vendor.

PARTY DECORATIONS
As you might have guessed, this part took nearly all my mental and physical energy. I ordered reams of pink, red and orange tissue and made millions of tissue poms enlisting the assistance of neighborhood kids and anyone who happened to stop by my house. The birthday swag used the poms in 2 sizes, hanging from ribbons and all attached to a Command hook. I did this part the weekend before so I could get a feel for the way it hung on the wall, which I highly recommend. I also created paper decorations with my Chiyogami paper to add some visual interest between the intense color and puff of the pom-poms. I threaded some smaller poms on the middle part of the swag and attached the "40" with tape. The numbers were cut from sparkly scrap-booking paper) I printed the number from my computer in reverse and trimmed it out with my Xacto blade. Whew!
After seeing the swag and the table decorations in place, my sister thought (correctly) that there was still not enough color. So we made a million more poms and put them on the window sills. Good thing I'd gotten so much tissue...I nearly used it all!

ENTERTAINMENT
I would have loved to have had a DJ at my party, but again with my minimal budget it could not be done. After thinking about it though, I realized that I had several good friends who had talents and might be willing to share them with everyone. Alas, Michael Mann (music officianado) created a playlist on his iPod that was played throughout the evening (the event place had a really easy hook-up for that kind of thing). Then the amazing April Combs (singer-songwriter from the LA based Honneycombs and children's music April8) sang a few songs with the amazing Laurie Burnham on back-up and Michael Mann on guitar. AND last, but not least, I convinced my cousin Mindy Jones (whose been singing in LA with Moby mmm-hmmm) to play and sing a song on the fly. The singing was definitely one of the highlights of my night. Such special people around me! It was magical, I tell you!
THE PHOTO WALL
This thing was massive and a lot of work, but I loved it and wouldn't have had my party without it! I used chicken wire and attached the (you guessed it) tissue poms with wire. I varied the sizes and colors so the pattern would appear random and full of texture. Again, I did this in my house the week before and hung the structure to Command hooks. This set-up was a little scary. The Command hooks fell once, but I wasn't sure if it was because I didn't wait the allotted 1 hour or didn't prep the wall properly. I must also admit to some concern with the camera set-up. I was going to just use my Canon Powershot on a tripod and use the flash attached. Not the best, but it was all this non-techie girl could do under the circumstances. Then my birthday karma came to the rescue. It turns out that the manager of the space (Gather-College Hill) is a photographer and he had a sturdy wooden backdrop that I could attach the chicken wire to, AND he let me use his professional lighting and boom, AND he even fixed the settings on my camera so the photos would work the best it could. It was truly a Birthday Miracle and I was ever so thankful. I bought some decorative frames from my trusty Goodwill, removed the glass or mirrors and painted the frames white. The guests really had a good time with the photos and I'm so glad I did it...otherwise I'd not have any pictures from the event!!
I keep forgetting things! I also suggested that guests wear something pink, orange or red. This proved to be a bit of a challenge, but I loved how everyone was participating in the theme (and looked great in all my pictures) See?

Whew! I think I got it all! Now that I've documented it, I think I can possibly not bring up my party for another week maybe. We'll see, though... :o)
Let's begin at the very beginning...the inspiration photo that I took last winter:

INVITATIONS
Designed by Margot Madison, world-famous invitation designer ;o) Letterpress with hot pink ink and inkless impression on Crane's Pearl 600 gsm cardstock. The liners were designed and printed in full color and cut to fit the envelopes. Envelopes were from Paper Source, A7 fuchsia. Fonts were Century Gothic and Aphrodite Slim Pro. You can read a little more about them here.

TABLE DECORATIONS
I used white stock tablecloths from the vendor. I purchased white paper doilies in 4", 8" and 12" sizes and placed them in a random (which means very purposely placed to look random) pattern along the length of the table. I used double stick tape for some of the doilies so they wouldn't be blown away when the AC kicked on. I spent several months collecting miscellaneous milk glass vases and containers from my local Goodwill. Not one was more than $2. If you don't have that kind of time, you can check around etsy vendors like this one and amass a collection pretty quickly. I focused on patterned designs and skipped the fruit and floral designs since my inspiration was more about graphic repeated patterns. The flowers were designed by my friend Joni from Sprouts Floral Designs who filled them with red, pink and orange roses and carnations. In an ideal world, they would have been ranunculous or peonies but those are just not available at the end of June in Cincinnati, Ohio. I thought the roses and carnations were an excellent substitute. Joni and I arranged groupings of vases based on differing shapes, heights and patterns. I loved how they looked, and also thought that even though they were so full of color, they still struggled to stand up to the bigness of the room. Had I a chance to do it again, I'd include at least twice as many per table.
The candles were Fenomen white pillars from IKEA that I covered in my Chiyogami decorative paper (found here) and adhered with my handy-dandy tape gun. The Glimma glass votives and votive candles were also from IKEA. I used some white puff paint to add a dot along the edge of the votives. I thought they needed a little somethin-somethin, you know? Of course I don't have a photo of the votives. I think I'll show that little project later on in a DIY Friday post.


These were my favorite to create and felt most like a gift from the essence of Margot-ness. I wanted to find some way to make my guests feel truly special and honored. I also wanted all my friends and family to mingle, which as a sometimes introvert I can understand the need for a little push in the social direction. The packets were custom envelopes created from left-over envelope liner stock. I created the die on my computer and gave it a disappointing try on the Silhouette SD. NOBODY told me that you can't put text stock on the adhesive boards without ruining both the paper and the board. That was very annoying but I persevered printed the template on the back of the paper (the white side). I then cut with my X-Acto knife and folded them into the little envelopes. I used Divine Twine in hot pink to tie them shut and wrote the guests names on pink, orange or red tags. Adorable! Inside I included custom name tags, using the round mandala design from my invitation printed onto pages of adhesive 2" circles from this on-line vendor. In addition to the guest's names, I included their relationship to me; Amy Benavente, Best Friend from College or Gail Bason, Margot's Mom etc. I think another great idea would be to include a fun fact about that person, but there were just too many guests to do that in my case. I included 2 Question Cards that had a set of 5 simple questions, encouraging guests to talk to someone they didn't know to get the answers. The cards were to be returned in a large glass container, where later in the evening I raffled off gifts that I'd brought with me. I must say, that I was most pleased with the results of this game. I saw friends and family from totally separate worlds talking to each other. It was really a joy for me to see that because awesome people should meet other awesome people! This approach took the awkwardness out of that first conversation, you know? I also had a hand-written note inside, thanking the guest for coming and for the other things they did for me throughout my 40 years of life. These notes were made from scrap envelope liner paper (I made good use out of that paper, didn't I??) folded on the short side and tucked into a business-card sized envelope that had the top chopped off with my rotary cutter scallop blade. Total cuteness.


The party started at 8 p.m. so most people should have eaten some kind of dinner. I wanted to make sure everyone had enough wine and beer, so I focused on that. Then I added snacks so that the wine and beer were absorbed into the system before they had to leave. The birthday cake was baked by George Sias, who was recommended to me by Karen from the I-Do Boutique in O'Bryonville. He is totally off the grid (meaning, he doesn't even use email *gasp!*) so if you would like his contact info, you can email me and I'll send it to you. The cake was white with strawberry filling, and chocolate with chocolate filling. Totally delish! The cake decoration was one of my sticking points in the planning process. I met with one cake vendor and left feeling totally afraid that they were going to give me something that looked too much like a wedding cake. And I had wedding cake trauma that I won't bore you with right now, but suffice it to say: I did not want a repeat disappointment. I saw a wonderful post on how to make ruffle flowers from fondant and thought, "Why not? I'll give it a shot myself." Several days and red-stained hands later, I had some decent ones and packed them up for the final day. I asked George to keep the cake decor a simple white with dots around the edges, and I would add these brightly colored ruffle flowers myself. When the time came to add them to the perfectly white cake, I panicked. I didn't want to put them on and hate it! And then it would be too late to change. I opted for the "less is more" approach and filled the top with my orange, red and pink candles. I'm SO HAPPY I did that. It looked perfect to me.

The rest of the food was snacky: Fancied up hummus, kalamata olives, marinated mozzerella balls, pita triangles, Spicy pretzels, veggie shots (an inspiration after my husband found a random case of shot glasses while cleaning our garage) of red and yellow peppers, carrot sticks and sugar snap peas with ranch dressing at the bottom, Killer Brownie bites, cream puffs, fruit wands with washi tape flags and assorted cheeses with crackers. I also had Mad*Pops (made by Madisono's Gelato in Cincinnati), delicious fruity popsicles in bright pink tubs filled with ice.
The drinks included white and red wine, bottled water, raspberry lemonade (made by my amazing husband), and a delicious Amber Ale from the local Mt. Carmel Brewery. I had it in a keg because that seemed way more fun than bottles. I haven't tapped a kegger since college!
PARTY HARDWARE
Pink, red and orange dessert plates and napkins were from trusty Target. I used white 16 oz paper cups I found on sale at my local paper store and personalized them by printing stickers with the mandala pattern. The wine cups were standard clear plastic. I prefer glass in most cases but I was on a tighter budget than that would allow.
All the food was placed on white ceramic dishes or white milk glass pedestals. I kept to square shapes because I'm neurotic that way. The pink glass bowls were a set from IKEA and very useful for stacking. I made a simple riser for the cake by covering a square box with pink tissue. The food signs were printed on white cardstock, edges trimmed into a "V" and curved on the tails like a banner that can stand itself up. You do that by holding one end of the card to a table edge, pressing the other side with your palm and firmly dragging it down (similar to curling ribbon, only without the ribbon and the scissors). The tablecloth on the food table is a vintage floral I purchased from this etsy vendor.

PARTY DECORATIONS
As you might have guessed, this part took nearly all my mental and physical energy. I ordered reams of pink, red and orange tissue and made millions of tissue poms enlisting the assistance of neighborhood kids and anyone who happened to stop by my house. The birthday swag used the poms in 2 sizes, hanging from ribbons and all attached to a Command hook. I did this part the weekend before so I could get a feel for the way it hung on the wall, which I highly recommend. I also created paper decorations with my Chiyogami paper to add some visual interest between the intense color and puff of the pom-poms. I threaded some smaller poms on the middle part of the swag and attached the "40" with tape. The numbers were cut from sparkly scrap-booking paper) I printed the number from my computer in reverse and trimmed it out with my Xacto blade. Whew!
After seeing the swag and the table decorations in place, my sister thought (correctly) that there was still not enough color. So we made a million more poms and put them on the window sills. Good thing I'd gotten so much tissue...I nearly used it all!

ENTERTAINMENT
I would have loved to have had a DJ at my party, but again with my minimal budget it could not be done. After thinking about it though, I realized that I had several good friends who had talents and might be willing to share them with everyone. Alas, Michael Mann (music officianado) created a playlist on his iPod that was played throughout the evening (the event place had a really easy hook-up for that kind of thing). Then the amazing April Combs (singer-songwriter from the LA based Honneycombs and children's music April8) sang a few songs with the amazing Laurie Burnham on back-up and Michael Mann on guitar. AND last, but not least, I convinced my cousin Mindy Jones (whose been singing in LA with Moby mmm-hmmm) to play and sing a song on the fly. The singing was definitely one of the highlights of my night. Such special people around me! It was magical, I tell you!
THE PHOTO WALL
This thing was massive and a lot of work, but I loved it and wouldn't have had my party without it! I used chicken wire and attached the (you guessed it) tissue poms with wire. I varied the sizes and colors so the pattern would appear random and full of texture. Again, I did this in my house the week before and hung the structure to Command hooks. This set-up was a little scary. The Command hooks fell once, but I wasn't sure if it was because I didn't wait the allotted 1 hour or didn't prep the wall properly. I must also admit to some concern with the camera set-up. I was going to just use my Canon Powershot on a tripod and use the flash attached. Not the best, but it was all this non-techie girl could do under the circumstances. Then my birthday karma came to the rescue. It turns out that the manager of the space (Gather-College Hill) is a photographer and he had a sturdy wooden backdrop that I could attach the chicken wire to, AND he let me use his professional lighting and boom, AND he even fixed the settings on my camera so the photos would work the best it could. It was truly a Birthday Miracle and I was ever so thankful. I bought some decorative frames from my trusty Goodwill, removed the glass or mirrors and painted the frames white. The guests really had a good time with the photos and I'm so glad I did it...otherwise I'd not have any pictures from the event!!
 |
| This is the photo wall in progress... |
 |
| The photos gave guests a reason to be silly and have fun! |
Whew! I think I got it all! Now that I've documented it, I think I can possibly not bring up my party for another week maybe. We'll see, though... :o)
Subscribe to:
Posts (Atom)