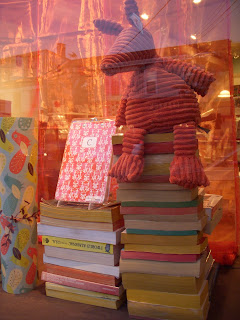

Well, we've got the next Margot Madison Stationery window completed and I thought I'd share about it.
First, the inspiration photo was from one of my favorite blogs decor8. There was a simple photo of these books stacked as a decorative element in someone's home. I tucked it into my little folder of inspiration images and started the wheels turning.

Our marketing concept was to promote the great gifts our customers can purchase through albums and catalogs of customizable products. We ordered our samples to match the colors we would have in the window: yellows, oranges, and teal greens.
Then I set out to find lots and lots of books. My "mojo" was working for me, and I was able to walk to the "Friends of the Library" sales warehouse just down my street. After much explanation as to why I wanted old paperback books with no care for subject matter, they allowed me to rummage through the recycling bins of books they had. I wasn't sure yet what I would need and just loaded my little car up with as much as would fit. I'll return the books after the window is down and let them make a little money for the recycling. A special thanks to the "Friends of the Library" on that one!
Back to the window now. I rummaged through and put stacks together, taking care to choose the edges that were stained in the red, yellow, orange and teal colors. I used a little Elmer's glue to give them some stability, though they still have a little tendency to teeter a bit. I did buy some ink to stain the edges of some of the books as fill-ins. I set the product on the top of the stacks and was nearly done.
Then I bought a simple curtain panel to hang behind the books to give some more color an continuity to the window. I kept Lindsay's painted Margot Madison "panel" and wrote in the words "Gift ideas By the Books" to tie the window concept together. FYI, since I had to paint the window on the inside (which would be backwards to me) I used a dry erase marker on the outside to sketch out the words and then painted from that template on the inside. Of course, then I wiped off the dry erase on the outside for a clean finish.

No comments:
Post a Comment